10. Tools Menu
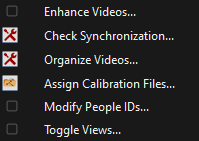
The Tools menu.
10.1. Enhance Videos
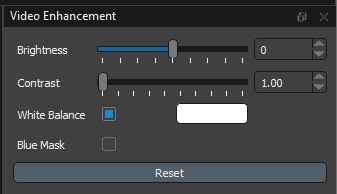
The Video Enhancement tool is used to improve video image quality before running the 2D inference, lens calibration, or chessboard calibration processes.
The Video Enhancement tool allows you to improve video quality before processing data, which can be especially useful for calibration under poor lighting conditions. Changes made using this tool are previewed for the loaded 2D views, and any enhancements are applied before running the 2D inference, lens calibration, or chessboard calibration processes. Therefore, what you see in the 2D views is how the video data will be processed.
Brightness: Increase or decrease the brightness of the videos. Default (no enhancement) is 0.
Contrast: Increase the contrast of the videos. Default (no enhancement) is 1.00.
White Balance: Adjust the white balance of the videos by performing a color correction using a baseline white color. Enable White Balance by selecting the square, and click on the white rectangle to open the color picker. You can select a specific color, input color values, or use the Pick Screen Color option to select a pixel from within your loaded videos of a white surface such as the chessboard.
Blue Mask: Shows which pixels are detected as blue by the chessboard calibration algorithm. This is useful for adjusting your videos before processing a chessboard calibration to ensure the blue squares are detected. The global coordinate system origin is defined at the intersection of the blue squares, which must be detected in order to define the origin.
Reset: Reset all changes to default values, removing any video enhancements.
10.2. Check Synchronization  
Synchronization of the video images can be checked after the trial has been analyzed fully. For each view, the 2D representation of the skeleton in that view is compared to the 3D skeleton computed from all views. If the alignment for a given view can be improved by shifting its video sequence forward or backward in time, this frame offset is reported in the dialog. You can then choose to correct the synchronization by applying these offsets to the out-of-sync views and clearing the entire analysis.
Note: This command does not work on trials with minimal motion, such as static trials. Additionally, if there is relatively little motion of all tracked people in a particular view, that view may be detected as out of sync with the others when it is not. For example, if the person is far from a camera (small image) and moving directly towards or away from it, there may be minimal motion of the person within the video image. Another example is part of the person being stationary during the trial and the camera capturing only the stationary part. Please check for false positives like these before correcting the synchronization.
10.3. Organize Videos 
The Organize Videos tool converts a folder of videos into a structure that can be used by Theia3D. This functionality is useful when collecting large data sets.
Basic
The Basic tab is the best option when organizing videos that have user-defined file names, such as those collected using OptiTrack, Qualisys, or Vicon camera systems. To use this feature, the video files must be named using the following reserved terms, separated by underscores or periods:
Cam ID: (Required) The ID of the camera corresponding to the video file. This must be the same ID as in the calibration file.
Subject: (Recommended) Unique subject identifier (i.e. sub001).
Action: (Recommended) The action the subject is performing (i.e. walk).
Trial: (Recommended) The trial number (i.e. 001 or walk01).
N/A: (Optional) Additional terms in the filename not used by Theia3D.
Note that while the reserved terms are separated by the delimiter, the terms themselves cannot include the delimiter. For example, if underscores are the delimiter, “slow_walk” is not a valid Action term because the program will parse it as two separate terms (“slow” and “walk”).
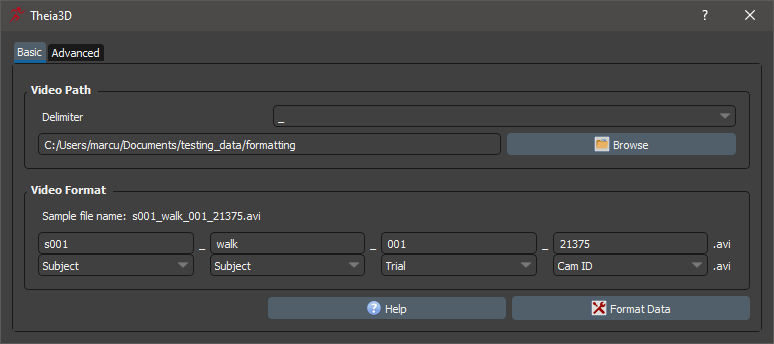
The Basic tab of the Format Videos dialog.
To format the videos, select the delimiter used in the file name and then select the folder containing the videos using the Browse button. When the directory is selected the dialog will parse the name of a sample file. Note that the delimiter can be changed after the folder is selected and the sample file name will be re-parsed. Use the drop down boxes to indicate the reserved term that each part of the filename corresponds to. Click Format Data to convert the folder to the required structure. The hierachy of the created directory is Subject > Action > Trial > Cam ID. Cam ID is the only reserved term that must be included in the filename; however, it is recommended to include as many of the other reserved terms as possible.
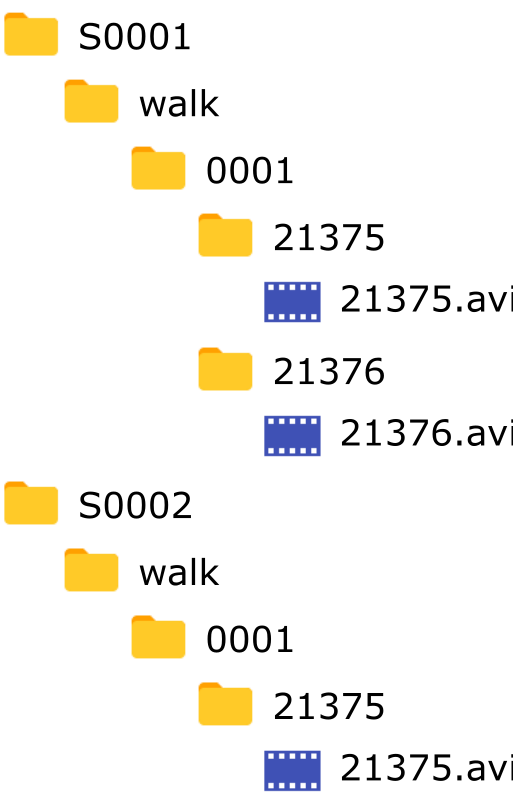
For example, consider a folder with the following video names:
S0001_walk_0001_8_21375.avi
S0001_walk_0001_8_21376.avi
S0002_walk_0001_8_21375.avi
To format these videos, the reserved terms selected are: Subject, Action, Trial, N/A, and Cam ID. The data structure after formatting is:
Advanced
The Advanced tab is the best option when organizing videos that do not have user-defined file names, such as those collected using Sony RX0 II camera systems. To use this feature, the names of the video files must end with camid_trialid, where camid is the ID of the camera that recorded the video and trialid is a unique identifier for the trial.
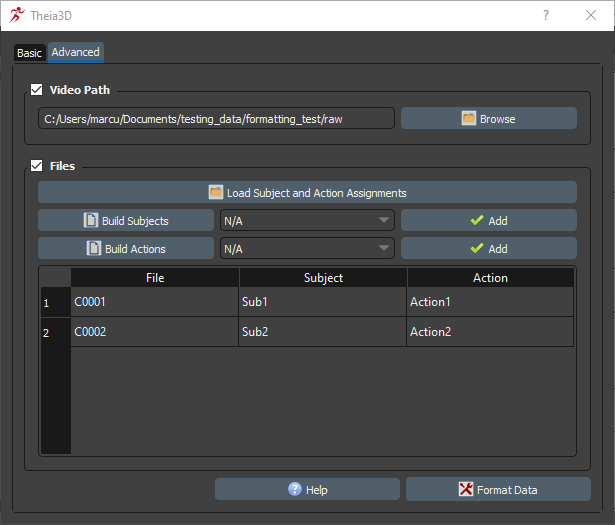
The Advanced tab of the Format Videos dialog.
To format the videos, select the folder containing the videos using the Browse button. The trial grid is then created with one row for each trial. The File column of each row is filled with the trialid for that trial.
Use the Load Subject and Action Assignments button to load the subject and action IDs for each of the trials from a csv file. Each row of the csv file must contain the trialid, subjectid, and actionid of a single trial, in that order, separated by commas. For example, the csv file used to assign the subject and action IDs in the above figure was:
Press the Format Data button to format the videos in the required folder structure.
Subject and action IDs can also be manually assigned to the trials without using a csv file.
Use the Build Subjects button to open another dialog and create the subject IDs for the trials. A list of previously saved subject IDs can also be loaded and the current list of subjects can be saved using this dialog. Press the Accept button and close the dialog when the subject list is complete. To assign a subject ID to the trials, select the subject ID from the dropdown menu and press the Add button. Select the trials corresponding to the subject from the trial grid (multi-select is possible using Ctrl or Shift modifiers and by click-and-drag) and press the Finish button.
Use the Build Actions button to open another dialog and create the action IDs for the trials. A list of previously saved action IDs can also be loaded and the current list of actions can be saved using this dialog. Press the Accept button and close the dialog when the actions list is complete. To assign an action ID to the trials, select the action ID from the dropdown menu and press the Add button. Select the trials corresponding to the action from the trial grid (multi-select is possible using Ctrl or Shift modifiers and by click-and-drag) and press the Finish button.
Press the Format Data button to format the videos in the required folder structure.
10.4. Assign Calibration Files  
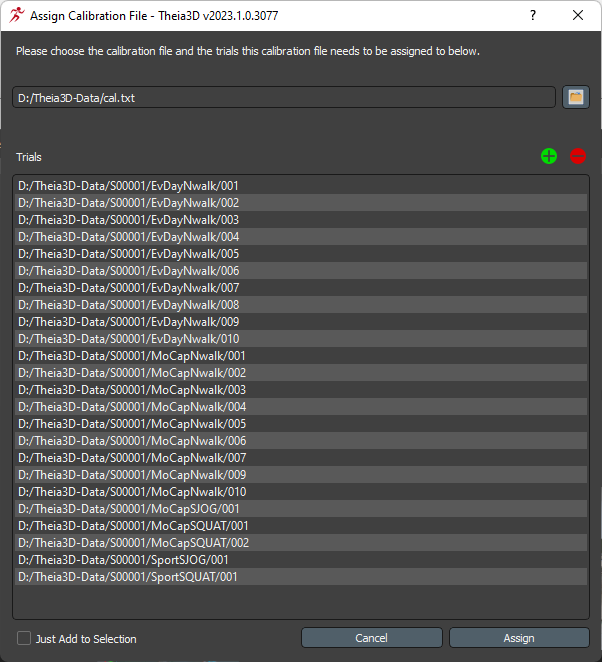
The assign calibration file tool.
The assign calibration file tool is used to copy and nest an extrinsic calibration file within individual trial folders, one level above the video files. This is best practice for storing calibration files with their associated movement trials, and is a requirement for running batch analyses.
Path to Calibration File: Use the Browse
 button to navigate to and select your extrinsic calibration .txt file.
Plus
 : Use the button to add trials to the Trials list by selecting a folder containing movement trials. All trials within the selected folder will be added to the Trials list, regardless of their depth within the selected folder.
Minus
 : Use the button to remove currently selected trials from the Trials list. Use shift+click or ctrl+click to select groups or individual trials to remove from the Trials list.
Just Add to Selection: Assign the calibration file to only the currently selected files within the Trials list.
Cancel: Close the Assign Calibration Files tool without assigning any calibration files.
Assign: Assign the calibration file to the trials in the Trials list or only the currently selected trials if Just Add to Selection is selected.
10.5. Modify People IDs
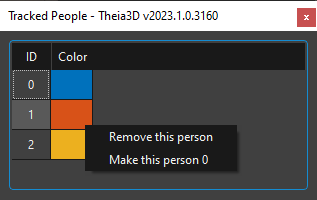
The modify people IDs tool.
The Modify People IDs tool allows you to swap the unique person ID numbers assigned to each person when multiple people are tracked in a trial. Click and drag an ID and drop it onto another ID to swap those two ID numbers. This change to the IDs is immediately visible in the 2D and 3D views. You can also right-click on an ID to display a context menu with options for removing that tracked person or making it person 0. Note that removing a person cannot be undone (except by re-running Track People).
10.6. Toggle Views
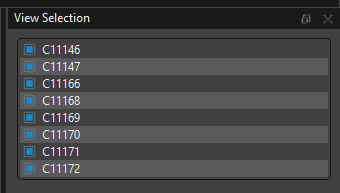
The toggle views tool.
The Toggle Views tool can be used to turn on and off individual camera views from the currently loaded videos. When turned off, camera views are greyed out in the 2D viewer area, and are not used when analyzing the trial.