5. File Menu

The File menu.
5.1. Clear Workspace  
Clear all loaded data and analysis results.
5.2. Load Video Data  
Load video files (.mp4 or .avi) for analysis. To load the videos, browse to and select the folder containing the videos. The structure of this folder must conform to the format described in Video Data.
5.3. Load Calibration File  
Load the camera calibrations for analysis. To load the calibrations, browse to and select the file containing the calibrations for all of the cameras. The calibration file must conform to the format described in Camera Calibration.
5.4. Load Workspace 
Open a previously saved workspace. To load the workspace, browse to and select the directory containing the workspace.
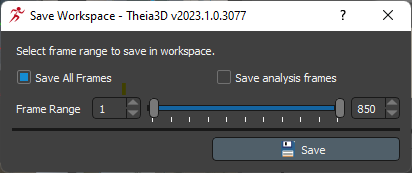
5.5. Save Workspace  
Save the videos, camera calibration, and analysis results in the current workspace to a directory in a format that can be opened by Theia3D. Select the frames to include in the workspace and press the Save button. Browse to the desired save location and enter the name of the directory that will be created to store the workspace files. To overwrite the current workspace, use the dialog to select a .t3d file in the existing workspace folder. Note that this only overwites the results (.t3d and .p3d files) and leaves the videos untouched. In this case, all frames in the workspace must be saved. It is not possible to save to an existing workspace folder other than the currently open one.
5.6. Save Calibration  
Save the current calibration. To save the calibration browse to the desired save location and enter the desired filename.
5.7. Save Model  
Save the scaled 3D model. To save the scaled model browse to the desired save location and enter the desired filename. Note that if multiple people are tracked a separate model will be saved for each of them. The files are automatically named as filename_personID.tmb, where personid is automatically assigned.
5.8. Save Skeleton Poses  
Save the 3D pose of the tracked people. Select the person (or all people) and the frame range (or select the option to use the analysis frames) to save in the file. Files can be saved in .c3d or .fbx format. The data included in the files is described in Pose.
For .c3d files there is an option to save a multi-subject file. If this option is selected, two .c3d files will be created - one with the unfiltered pose and one with the filtered pose. Both files will contain all tracked subjects. If the multi-subject option is not selected, separate files will be created for each tracked subject.
For .fbx files there is an option to select the exported cooridinate system. Preset options are available for common software programs or custom coordinate system can be defined. Saving an .fbx file requires the animation model to be used when solving the pose.
With the desired options selected, press the Save button, browse to the save location and enter the filename. The person ID and filtered tag are appended to the filename as needed.
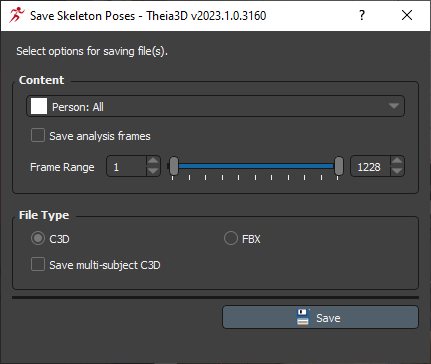
The save pose dialog for .c3d files.
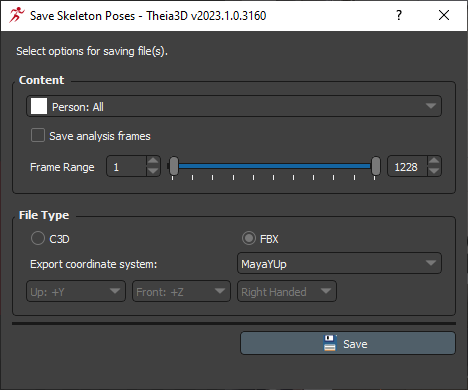
The save pose dialog for .fbx files.
5.9. Save CMZ (Open in Visual3D)  
Opens the pose data for all tracked people in Visual3D. Note: The filtered poses are loaded into Visual3D, and the path to the Visual3D executable must be set correctly in the settings dialog. We strongly recommend an active support agreement for Visual3D, as it is frequently updated to support the latest Theia model changes.
5.10. Save Video Overlay  
Save each of the 2D view video overlays as an .avi file. The videos saved are identical to the overlays shown in Theia3D; therefore you should modify the options that affect the 2D visualizations in the Display Menu and Settings Menu before saving video overlays. Select the desired frame rate and the frame range (or select the option to use the analysis frames) of the videos and press the Save button. Browse to the desired save location and enter the desired filename. One video file will be saved for each overlay and the files are automatically named as filename_cameraID.avi. Note that individual 2D view overlays can be saved as videos by right-clicking on the view while pressing the Ctrl key.
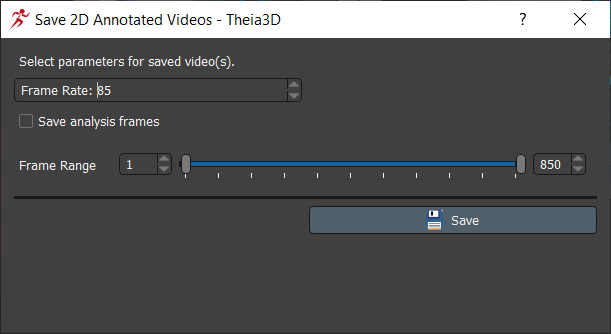
The Save Video(s) dialog.
5.11. Save 3D View  
Save the 3D scene as an .avi video file. The video saved is identical to the 3D view shown in the 3D Viewer; therefore you should modify the options that affect the 3D visualizations in the Display Menu and Settings Menu before saving before saving 3D View videos. Select the desired frame rate and the frame range of the videos and press the Save button. Browse to the desired save location and enter the desired filename. Note that the 3D view can also be saved by right-clicking on the view while pressing the Ctrl key.
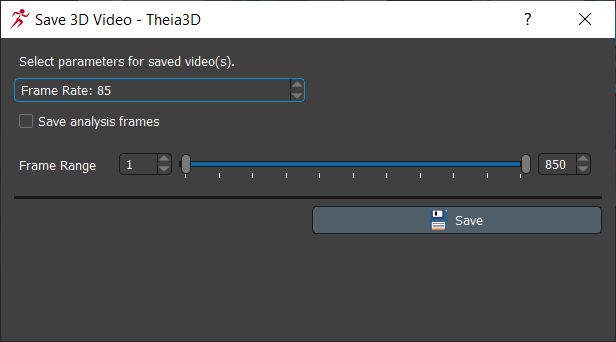
The Save 3D View dialog.